Is your computer not strong enough to edit 4K files, or does it start to lag with 1080p files? Especially when you start to add effects? When uploading files does it take ages? If this is the case for you and you’d like to speed up the post production process, Premiere’s Proxy method may be right for you. This blog post will talk about what proxy files are, how to create them, how to send them to EditSmart, and then how to reconnect the high resolution files once the editing is done.
What are proxy files?
To put it simply, proxies are low resolution versions of your high resolution files. If you adjust the settings right, they can be a fraction of the size of the high-res files and are still great to edit with. Because proxy files are low-res, computers are able to process them much faster which makes for smoother editing. You can actually adjust the settings to create proxy files that are 3% the size of the originals and still workable.
How to create proxy files.
1. PLEASE note, the very first thing you’ll want to do is rename any files that have the same name. (Example: If you have two files with the name C0001.mp4, rename one of them to be C0001-1.mp4) This is important because if multiple files have the same name, Premiere will have a harder time reconnecting the full-res files automatically when you’re done using the proxies. You’ll end up having to reconnect these files manually which will take more time. Here is a helpful link to learn how you can quickly change the names of multiple files all at once.
2. Next, you’ll open up Premiere and create a new project. After giving your project a name, click on the Ingest Settings tab. From here you’ll check the box next to Ingest, and select Create Proxies from the drop down options.
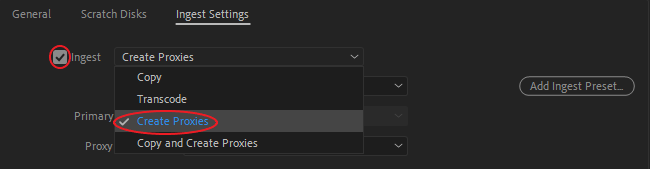
Beneath that you’ll select what kind of ingest settings to use in creating the proxies. We played around with these options and in the end we made our own so the files would be 3% of the original size. We recommend using our ingest setting unless you’ve done this before and already have a preference. You can download our ingest setting here, and then click the download button. (If this doesn’t work for whatever reason, please email us and we will send you the ingest setting.)
3. Once you’ve downloaded the EditSmart Ingest Preset, you’ll click on the Add Ingest Preset on the right side, and open the EditSmart Ingest Preset from wherever you’ve saved it on your computer. Lastly, before creating the project, you’ll select where you’d like your proxy files to go once they’re made. We suggest creating a folder, or subfolder, and have all your proxy files go there to help avoid confusion. Now you’re ready to click OK and create your project!
4. With your project ready to go, import all the files you wish to turn into proxy files. (This will only work with video files) As soon as you finish importing a batch of files to Premiere, Media Encoder will fire up. Without you needing to do anything, Media Encoder will start to process each video file you just imported to Premiere. Once Media Encoder is done creating a proxy, that new file will automatically get placed in the new folder you created. If you need to import more files to Premiere, go ahead and do so, they will be added to the queue within Media Encoder. And that’s everything! You’re on your way to creating proxy files!
How to upload to EditSmart once proxy files are made.
After Media Encoder has finished processing all of your files, you should have a folder full of files that have _Proxy in their name. When you go to EditSmart to start a new project, you’ll fill out your instructions just like before, but instead of selecting the Standard upload method (already pre-selected), you’ll select the Adobe Premiere Pro CC – Proxy Method. Everything else will remain the same and you’ll upload the newly made proxy files to us, which should be a breeze!
How to reconnect high resolution files to proxy files.
Once we’ve finished editing, we’ll still send you an export of the video so you can take a look. We’ll also send you the project file just like any other project. If the low res video is to your liking, proceed to download the project file. Save the project file to wherever you have the high-res files stored on your computer. Now go ahead and open the project file. When you first open the project file, a little window will appear to let you know that some of the media is offline. You can ignore this window and close it.
Locate and select all of the files within your project (even if you select the audio files it’s okay) by either clicking and dragging over all of them or by pressing Ctrl+A. Next, right click on one of the files. Hover over the Proxy option, and click on the Reconnect Full Resolution Media… sub-option.

A small window will appear with the first file highlighted. This is the full-res file you’ll be searching for once you click Attach. Once you’ve found the full-res file, click OK. If all of your files are located in the same folder, the rest of the files will automatically reconnect for you and you’ll be done! If some of the files are located in other folders, you’ll repeat the above process until all files have been reconnected.
That’s everything. From creating proxies, sending them, and reconnecting the hig-res files, you know it all now! If this process of using proxies is a bit overwhelming, please give us a call or send an email! We’re here for you and got your back! Our contact information can be found here.